By Janne Lahtela
We started our blog series about developing Smart TV applications in 2021 and they have been very popular. Since then, we have covered:
- How to get started
- General tips designing multiplatform TV applications and handling Problems & Solutions
- UI and UX in Smart TV apps
- Handling remote control keys
- Handling pointer events
- Building spatial navigation
- Creating a video player for Smart TV app
Let’s continue from where we got to last time. This time we are implementing a simple player user interface, which has play-pause, fast forwarding and rewinding features. I also think that we should move towards object-oriented programming, this will be useful when the project expands. If you are not familiar with object-oriented programming, I recommend getting to know it a bit before moving on to the actual code examples.
Smart TV app video player: Let’s get started!
First, let’s create a new html element for the Player UI into the index.html file.
					<!DOCTYPE html>
<html>
    <head>
        <meta charset="UTF-8">
        <title>My Awesome Smart-TV -app!</title>
        <link rel="stylesheet" type="text/css" href="./css/styles.css" />
        <script data-minify="1" src="https://sofiadigital.com/wp-content/cache/min/1/ajax/libs/shaka-player/4.5.0/shaka-player.compiled.js?ver=1770280632" crossorigin="anonymous" referrerpolicy="no-referrer"></script>
        <script type="text/javascript" language="javascript">
            document.addEventListener("DOMContentLoaded", function(event) {
                createApp();
            });
        </script>
        <script src="./js/player.js"></script>
        <script src="./js/playerUI.js"></script>
        <script src="./js/app.js"></script>
    </head>
    <body>
        <div id="app"></div>
        <div id="playerUI"></div>
        <video id="video" autoplay></video>
    </body>
</html>
The id of the element is playerUI so we have a place where we can create all the buttons like play and pause, and maybe a progress bar if necessary. All the elements inside the playerUI are created in a playerUI.js file so our index.html stays as clean as possible.
Let’s create a playerUI.js file in the js directory, where we implement playerUI’s features and the key handler.
					/**
 * Player UI Constructor
 * @param {object} the video player instance
 */
function playerUI(videoPlayer) {
    this.videoPlayerInstance = videoPlayer;
    this.playerUIonScreenTimer = null;
    this.playerUIRootElement =  document.getElementById("playerUI");;
    this.playerUIonScreen = false;
    this.playPauseButton = null;
    this.init();
}

/**
 * Creates the video player UI elements
 */
playerUI.prototype.init = function() {
    let playPauseButton = document.createElement('div');
    playPauseButton.setAttribute("id", "playPauseButton");
    playPauseButton.classList.add("playing");
    this.hide();
    this.playerUIRootElement.appendChild(playPauseButton);
    this.playPauseButton = playPauseButton;
}

/**
 * Shows the player UI
 */
playerUI.prototype.show = function() {
    this.playerUIonScreen = true;
    this.playerUIRootElement.style.display = "block";
}

/**
 * Checks is player UI on the screen
 * @returns {boolean} is the player UI on the screen
 */
playerUI.prototype.isOnScreen = function() {
    return this.playerUIonScreen || false;
}

/**
 * Hides the player UI
 */
playerUI.prototype.hide = function() {
    document.getElementById("playerUI").style.display = "none";
    this.playerUIonScreen = false;
}

/**
 * Handles all the key events which are coming to the player UI
 * @param {object} event Key event
 */
playerUI.prototype.handleKeyPress = function(event) {
    console.log("playerUI.prototype.handleKeyPress", event);
    clearTimeout(this.playerUIonScreenTimer);
    switch(event.keyCode) {
        case RC_ENTER:
            /**
             * Toggles play and pause when enter is pressed
             */
            this.videoPlayerInstance.playPause();
            this.playPauseButton.classList.toggle("paused");
        break;
        case RC_LEFT:
            /**
             * Pressing left rewinds
             */
            this.videoPlayerInstance.rewind();
            break;
        case RC_RIGHT:
            /**
             * Pressing right fast forwards
             */
            this.videoPlayerInstance.fastForward();
            break;
        case KB_BACK:
        case RC_BACK:
            /**
             * Pressing back stops a video stream
             */
            stopVideo();
            break;
        default:
    }

    /**
     * Hides player UI when there is no key events coming over three seeconds
     */
    const that = this;
    this.playerUIonScreenTimer = setTimeout(function() {
        that.hide();
        clearTimeout(that.playerUIonScreenTimer);
    }, 3000);
}

/**
 * Destroys the player UI after the video player stream is closed
 */
playerUI.prototype.destroy = function() {
    this.hide();
    document.getElementById("playerUI").innerHTML = "";
    this.videoPlayerInstance = null;
}
Js/playerUI.js
DocBlocks tell where the functions are used. I recommend that you use DocBlocks so the next person who’s maintaining your code can do it easily.
Then we need to implement a couple of lines of code to the player.js so that our playpause button and fast forward+rewind works. Let’s Implement them to the end of the player.js file.
					/**
  * Toggles play and pause
  */
 videoPlayerShaka.prototype.playPause = function() {
    if(window.video.paused) {
      window.video.play();
    } else {
      window.video.pause();
    }
 }

 /**
  * Fast forwards 5 seconds
  */
 videoPlayerShaka.prototype.fastForward = function() {
    window.video.currentTime += 5;
 }

 /**
  * Rewinds 5 seconds
  */
 videoPlayerShaka.prototype.rewind = function() {
    window.video.currentTime -= 5;
 }
Js/player.js
Now we have required changes in index.html and player.js, and we have created the playerUI.js file. The next step is to add some CSS changes to the styles.css which should be in the css folder. Instead of using images as a background let’s use SVG tags.
One easy way to toggle between play and pause is to just change a html elements class, in this case we use classes named as playing and paused.
					#playerUI > #playPauseButton {
  width: 280px;
  height: 280px;
  margin-left: 100px;
  margin-top: 100px;

}

#playerUI > #playPauseButton.playing {
  background-image: url('data:image/svg+xml,<svg width="250px" height="250px" viewBox="0 0 24 24" fill="none" xmlns="http://www.w3.org/2000/svg" stroke="%23fff"><g id="SVGRepo_bgCarrier" stroke-width="0"></g><g id="SVGRepo_tracerCarrier" stroke-linecap="round" stroke-linejoin="round" stroke="%23CCCCCC" stroke-width="0.048"></g><g id="SVGRepo_iconCarrier"><circle cx="12" cy="12" r="10" stroke="%23fff" stroke-width="1.5"></circle><path d="M15.4137 10.941C16.1954 11.4026 16.1954 12.5974 15.4137 13.059L10.6935 15.8458C9.93371 16.2944 9 15.7105 9 14.7868L9 9.21316C9 8.28947 9.93371 7.70561 10.6935 8.15419L15.4137 10.941Z" stroke="%23fff" stroke-width="1.5"></path></g></svg>');
  background-size: contain;
}

#playerUI > #playPauseButton.paused {
  background-image: url('data:image/svg+xml,<svg width="200px" height="200px" viewBox="0 0 24 24" fill="none" xmlns="http://www.w3.org/2000/svg" stroke="%23fff"><g id="SVGRepo_bgCarrier" stroke-width="0"></g><g id="SVGRepo_tracerCarrier" stroke-linecap="round" stroke-linejoin="round" stroke="%23CCCCCC" stroke-width="0.192"><circle cx="12" cy="12" r="10" stroke="%23fff" stroke-width="1.5"></circle><path d="M8 9.5C8 9.03406 8 8.80109 8.07612 8.61732C8.17761 8.37229 8.37229 8.17761 8.61732 8.07612C8.80109 8 9.03406 8 9.5 8C9.96594 8 10.1989 8 10.3827 8.07612C10.6277 8.17761 10.8224 8.37229 10.9239 8.61732C11 8.80109 11 9.03406 11 9.5V14.5C11 14.9659 11 15.1989 10.9239 15.3827C10.8224 15.6277 10.6277 15.8224 10.3827 15.9239C10.1989 16 9.96594 16 9.5 16C9.03406 16 8.80109 16 8.61732 15.9239C8.37229 15.8224 8.17761 15.6277 8.07612 15.3827C8 15.1989 8 14.9659 8 14.5V9.5Z" stroke="%23fff" stroke-width="1.5"></path><path d="M13 9.5C13 9.03406 13 8.80109 13.0761 8.61732C13.1776 8.37229 13.3723 8.17761 13.6173 8.07612C13.8011 8 14.0341 8 14.5 8C14.9659 8 15.1989 8 15.3827 8.07612C15.6277 8.17761 15.8224 8.37229 15.9239 8.61732C16 8.80109 16 9.03406 16 9.5V14.5C16 14.9659 16 15.1989 15.9239 15.3827C15.8224 15.6277 15.6277 15.8224 15.3827 15.9239C15.1989 16 14.9659 16 14.5 16C14.0341 16 13.8011 16 13.6173 15.9239C13.3723 15.8224 13.1776 15.6277 13.0761 15.3827C13 15.1989 13 14.9659 13 14.5V9.5Z" stroke="%23fff" stroke-width="1.5"></path></g><g id="SVGRepo_iconCarrier"><circle cx="12" cy="12" r="10" stroke="%23fff" stroke-width="1.5"></circle><path d="M8 9.5C8 9.03406 8 8.80109 8.07612 8.61732C8.17761 8.37229 8.37229 8.17761 8.61732 8.07612C8.80109 8 9.03406 8 9.5 8C9.96594 8 10.1989 8 10.3827 8.07612C10.6277 8.17761 10.8224 8.37229 10.9239 8.61732C11 8.80109 11 9.03406 11 9.5V14.5C11 14.9659 11 15.1989 10.9239 15.3827C10.8224 15.6277 10.6277 15.8224 10.3827 15.9239C10.1989 16 9.96594 16 9.5 16C9.03406 16 8.80109 16 8.61732 15.9239C8.37229 15.8224 8.17761 15.6277 8.07612 15.3827C8 15.1989 8 14.9659 8 14.5V9.5Z" stroke="%23fff" stroke-width="1.5"></path><path d="M13 9.5C13 9.03406 13 8.80109 13.0761 8.61732C13.1776 8.37229 13.3723 8.17761 13.6173 8.07612C13.8011 8 14.0341 8 14.5 8C14.9659 8 15.1989 8 15.3827 8.07612C15.6277 8.17761 15.8224 8.37229 15.9239 8.61732C16 8.80109 16 9.03406 16 9.5V14.5C16 14.9659 16 15.1989 15.9239 15.3827C15.8224 15.6277 15.6277 15.8224 15.3827 15.9239C15.1989 16 14.9659 16 14.5 16C14.0341 16 13.8011 16 13.6173 15.9239C13.3723 15.8224 13.1776 15.6277 13.0761 15.3827C13 15.1989 13 14.9659 13 14.5V9.5Z" stroke="%23fff" stroke-width="1.5"></path></g></svg>');
  background-size: contain;
}
Css/styles.css
Now all we have left is the changes to the app.js file. Let’s start the changes by creating our own variable for the player UI almost at the beginning of the file just like the video player.
					/**
 * The video player UI
 */
let videoPlayerUI = null;
Js/app.js
Then we want to direct key events to the playerUI.js’s handleKeyPress-function. So, let’s add some way to handle this at the beginning of the app.js’s handleKeyPress-function.
					/**
 * Function which is called when a key is pressed
 */
function handleKeyPress(event) {
  console.log('handleKeyPress', event)
  const current = getFocus();

  /**
   * Directs key events to the player UI when a video stream is on
   */
  if(videoPlayer !== null && videoPlayerUI !== null) {
    if(!videoPlayerUI.isOnScreen()) {
      videoPlayerUI.show();
    }
    videoPlayerUI.handleKeyPress(event);
    return;
  }
Js/app.js
Then a couple of changes left. First, playVideo-function, lets add of code for the player UI
					/**
 * Creates and starts video player
 * @param {string} url
 */
async function playVideo(url) {
  root.style.display = "none";
  videoPlayer = new videoPlayerShaka(url);
  videoPlayerUI = new playerUI(videoPlayer);
}
Js/app.js
Then let’s add some cleaning when a video stream is stopped. Notice videoPlayerUI variable.
					/**
 * Stops and destroys
 */
function stopVideo() {
  if(videoPlayer !== null) {
    video.pause();
    video.style.display = "none";
    videoPlayerUI.destroy();
    videoPlayerUI = null;
    video.currentTime = 0;
    window.video = null;
    player.unload();
    player.destroy();
    videoPlayer = null;
    root.style.display = "block";
  }
}
Js/app.js
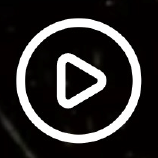
And now you should see when you press a key, and a video stream is rolling playing-icon.
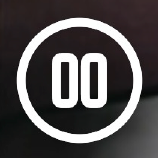
And if you press enter/ok a video stream should stop, and the icon should change to paused icon.
And if you press right a video stream should go fast forward five seconds and vice versa when you press left.
What key features we are missing here in my option are e.g progress bar and a mouse event handler, and because we have started to also learn object-oriented programming it would be wise to refactor app.js file so it’s also coded object-oriented programming style.
Now we have scratched the surface of how to implement a Smart TV application. We have created an application where you can watch videos, but we have not invested in essential things such as user experience.
Five common mistakes to avoid in the future
As you approach the final stages of development and prepare to launch your Smart TV app, there are numerous pitfalls that can easily be missed. To ensure your app’s success and deliver a seamless user experience, it’s essential to keep in mind these common oversights:
- Not supporting different ways of navigation
For example, some LG televisions have support for their own pointer-enabled remote controller called the MRCU (Magic Remote Control Unit), which is a point and click device which triggers the pointer events on the supported and registered TV just like a mouse would. Read more about Pointer events.
- Making the player slow to navigate
The Player UI should have intuitive ways to navigate quickly to different parts of the timeline with a responsive forward and rewind functions. Accelerating movement in the timeline and video thumbnails are good features to enhance the user experience.
- Seeing setting subtitles as a secondary feature
In many regions (like here in Finland) we use subtitles basically almost 100% in foreign content. If the player forgets the default subtitle language or selecting the language is difficult, user frustration is guaranteed. Read more about user frustrations in our blog: TOP 5 Frustrations in Smart TV user experience.
- Neglecting Adaptive Streaming and Buffer Management
It’s critical to focus on streaming quality. Viewers expect a smooth experience, so ensuring your video player adapts to varying network conditions and manages buffering efficiently is key. This can prevent user frustration from video lags or quality drops. Regular streaming performance testing under different network scenarios is also essential to maintain a quality user experience.
- Worst mistake: forgetting platform fragmentation and compatibility
Given the diverse range of Smart TV platforms and operating systems(link) it’s essential to select and prioritize the devices and platforms your app should support. The smooth operation of the player is the most important aspect of your application. Only way to ensure this is to test the playback and UI functions with real Smart TVs. If you need a hand, our e-zoo includes over 200 devices, enabling manual and automated testing services for app developers. Contact us to know more.
